Air Fryer Bread
Discover the joy of baking delicious, homemade bread right in your air fryer! Say goodbye to the traditional oven and hello to a quick, convenient, and healthy way to enjoy freshly baked loaves. This article will guide you through an easy, no-knead Air Fryer Bread recipe. It produces a light, fluffy interior with a golden, crispy crust.
Whether you’re new to bread baking or an experienced home chef, this air fryer bread recipe is sure to become a new favorite.
Key Takeaways
- Bake homemade bread quickly and easily in your air fryer
- Enjoy a soft, fluffy interior and a golden, crispy crust
- No kneading required for this simple, no-knead recipe
- Make healthy, delicious bread without the need for traditional ovens
- Discover the versatility of air fryer recipes for baking bread
Making Air Fryer Bread: A Simple and Delicious Recipe
Baking fresh, homemade bread is now easier than ever with the air fryer. Just a few basic ingredients and your air fryer can make a delicious loaf quickly. This recipe is perfect for both seasoned bakers and kitchen novices.
Ingredients and Equipment Needed
To make air fryer bread, you’ll need:
- All-purpose flour or whole wheat flour
- Warm water
- Salt
- Yeast
- An air fryer
- A heat-safe baking dish or pan that fits inside your air fryer basket
This recipe doesn’t need eggs, dairy, oil, or sweeteners. The secret is a high water-to-flour ratio, about 70% by weight. This makes the bread soft and airy.
| Ingredient | Quantity |
|---|---|
| All-purpose flour or whole wheat flour | 3 cups (360g) |
| Warm water | 2 cups (480ml) |
| Salt | 1 teaspoon |
| Yeast | 1 teaspoon |
With these simple ingredients and your air fryer, you’re ready to enjoy freshly baked, homemade bread.
Step-by-Step Instructions for Air Fryer Bread
Baking fresh, homemade bread in an air fryer is a game-changer. It’s simple, straightforward, and always delicious. Follow these steps to make tasty air fryer bread at home:
- Begin by mixing the dough ingredients until they’re well combined. This no-knead recipe is easy – just a quick mix is needed.
- Shape the dough into a smooth ball and put it in a lightly greased air fryer basket. Let it rise for about an hour, until it doubles in size.
- Preheat your air fryer to 390°F (200°C). This high heat is crucial for a perfect golden-brown crust on your air fryer bread.
- After preheating, carefully place the risen dough in the air fryer basket. Cook for 15-20 minutes, checking often, until the bread is beautifully browned and sounds hollow when tapped.
- Take the freshly baked bread out of the air fryer and let it cool a bit before slicing and serving. Enjoy your homemade air fryer bread with your favorite toppings or with soups and stews.
The secret to perfect air fryer bread is letting the dough rise right and adjusting cooking time and temperature for that perfect crust. Follow these simple steps to bake delicious air fryer bread quickly.
“The air fryer is a game-changer for homemade bread. It’s so easy to get that perfect crust every time.”
Whether you’re an experienced baker or new to air fryer baking tips, these instructions will help you make how to make air fryer bread that will wow everyone. Get ready to enjoy the amazing aroma and flavor of freshly baked no-knead air fryer bread from your kitchen.

Tips for Perfect Air Fryer Bread Every Time
Getting the Right Texture and Crust
Making perfect air fryer bread is a fun challenge. To get it right every time, remember a few important tips. First, don’t overwork the dough. Just shape it gently into a ball to avoid a dense texture.
The rise time is also key for the perfect air fryer bread texture. Let the dough proof fully before baking. This helps create a great crumb structure. For a beautiful air fryer bread crust, brush the loaf with melted butter or egg wash before air frying. This adds a shiny, crisp exterior.
Watch the bread closely towards the end of baking. Air fryers can cause over-browning. So, pull the air fryer bread out a minute or two early if it’s getting too dark. With these easy air fryer bread tips, you’ll make amazing loaves quickly.
“The key to perfect air fryer bread is all about striking the right balance – not over-kneading the dough, allowing ample rise time, and keeping a watchful eye during the final baking stage.”
Air Fryer Bread Troubleshooting
While air fryer bread is easy to make, some issues can pop up. If your bread feels dense or dry, it might be because you over-mixed the dough. Or, it could be that it didn’t rise enough. If your bread is doughy or not fully baked, check if you need to tweak the temperature or cooking time for your air fryer.
Sticking or crumbling can be fixed by using parchment paper in the baking dish. Here are some troubleshooting tips for air fryer bread problems and air fryer bread issues:
- Adjust the temperature and cooking time – Air fryers can vary, so you might need to experiment. Try changing the temperature in 10-degree steps and the time in 1-2 minute steps.
- Prevent sticking – Use parchment paper in the air fryer basket or tray. This will stop your air fryer bread from sticking and falling apart.
- Knead the dough properly – Don’t knead too little or too much. Aim for 5-7 minutes to get the right texture.
- Allow for proper rising – Let your dough rise until it doubles in size before baking. Skipping this step can cause air fryer bread not cooking right.
Keep an eye on your bread and adjust as needed for the perfect air fryer bread. With a bit of practice, you’ll master solving any air fryer bread problems that come your way.

Storing and Freezing Air Fryer Bread
After enjoying the aroma and taste of air fryer bread, it’s key to store it right. This keeps it fresh and tasty for longer. Learning how to store it properly is crucial.
To store air fryer bread, slice it and freeze the slices. This stops the whole loaf from getting stale. Just put the slices in an airtight container or bag and freeze. When you want a slice, thaw it at room temperature.
For unsliced bread, store it in an airtight container at room temperature for 3-4 days. To freeze it longer, wrap the loaf in plastic wrap or foil. This keeps it fresh for up to 6 months.
It’s vital to cool the bread completely before storing. This prevents mold and staleness by avoiding condensation.

By following these tips, your air fryer bread will stay fresh and delicious. Enjoy your homemade creations for days to come!
Versatility of Air Fryer Bread
Air fryer bread is incredibly versatile. It can be used in many recipes and meals. The basic recipe is a great starting point for experimenting with different flavors.
Whether you like a classic white loaf or want to try something new, baking in an air fryer is easy. It opens up a world of possibilities.
Variations and Recipe Ideas
One of the best things about air fryer bread is how adaptable it is. You can add herbs, cheese, or other mix-ins to the dough for a tasty twist. It’s perfect for making sandwiches, French toast, breadcrumbs, bruschetta, and more.
The air fryer’s quick baking time makes it easy to try new flavors. Whether you prefer savory or sweet, there’s always something new to try with air fryer bread.
| Air Fryer Bread Recipe | Variation | Serving Suggestion |
|---|---|---|
| Classic White Bread | Herb-Infused Bread | Grilled Cheese Sandwiches |
| Whole Wheat Bread | Cheddar Cheese Bread | Breakfast Toast |
| Garlic Parmesan Bread | Cinnamon Raisin Bread | Bread Pudding |
No matter which recipe or variation you choose, homemade bread is always a delight. Air fryer bread is a true kitchen staple because of its versatility.

Benefits of Making Bread in an Air Fryer
Baking bread in an air fryer is faster and uses less energy than an oven. It makes a crispy crust and a soft inside. Air fryers also eliminate the need for added oils or fats, making air fryer bread a healthier option. Plus, you don’t have to knead the dough, making it easy to make homemade bread anytime.
The air fryer’s small size is a big plus. It lets you bake small batches or individual loaves without heating up your kitchen. This is great for those with limited space or who want to keep their kitchen cool, especially in warm weather.
Another big plus is how fast and efficient air fryers are. They heat up quickly and use less energy than an oven. Some air fryer models even claim to cook up to 50% faster than fan ovens.
In the end, making bread in an air fryer is all about convenience, health, and saving money. It’s a great way to enjoy delicious, crispy bread with little effort. The air fryer is a versatile tool that makes homemade baked goods easy to make.
No-Knead Air Fryer Bread Recipe
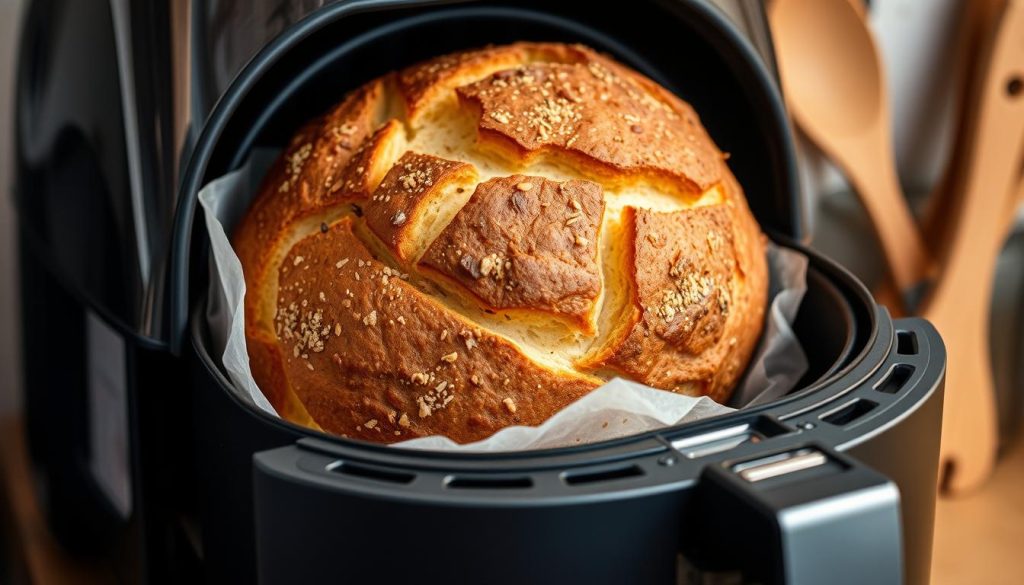
Baking fresh bread is now easier with an air fryer. This no-knead air fryer bread recipe is a game-changer. It gives you a crusty, delicious loaf with little effort. Whether you’re a seasoned baker or new to the kitchen, this recipe will have you enjoying warm, fragrant bread quickly.
Ingredients and Method
To make this no-knead air fryer bread, you’ll need just a few basic ingredients:
- All-purpose flour
- Instant yeast
- Sugar
- Salt
- Warm water
- Melted butter or oil (optional)
The process is simple. Start by mixing the dry ingredients in a large bowl. Add the warm water slowly and stir until the dough forms. No kneading is needed! Let it rise for about an hour, then shape it into a ball and place it in a baking dish. Air fry the bread at a high temperature until it’s golden brown, about 30-35 minutes. You’ll get a fresh, crusty loaf of homemade bread with minimal effort.
This no-knead air fryer bread recipe is perfect for busy home cooks. It lets you enjoy the taste of freshly baked bread without the hassle of traditional methods. With just a few simple ingredients and a quick air frying process, you can have a delicious, homemade loaf ready in no time.
Air Fryer Bread
Baking bread in an air fryer is a game-changer. The hot, circulating air cooks the dough evenly. This results in a perfectly cooked loaf with a beautifully crisp crust. Plus, air fryers use less energy than traditional ovens, making it more efficient and cost-effective.
Looking to save time, reduce energy usage, or enjoy baking bread’s aroma? The air fryer is perfect. With just a few simple ingredients and a bit of effort, you can have warm, crusty air fryer bread ready in no time.
| Ingredient | Amount |
|---|---|
| All-Purpose Flour | 1 piece |
| Instant Yeast | 1 teaspoon |
| Salt | 1/2 teaspoon |
| Granulated Sugar | 1 tablespoon |
| Warm Water | 1/2 cup |
| Olive Oil | 1 tablespoon |
To make perfect air fryer bread, start by preheating your air fryer to 300°F. This usually takes 2-3 minutes. Then, let the dough rest for at least an hour to rise well before air frying.
Once the dough is ready, place it in the air fryer basket. Cook for about 3 minutes. Keep an eye on the bread to avoid overcooking. Flip it halfway for even browning.
“The key to perfect air fryer bread is a crisp crust and a tender, fluffy interior. With a little practice, you’ll be able to achieve that every time!”
Enjoy your freshly baked air fryer bread with your favorite toppings or as homemade toast. The possibilities are endless with an air fryer!
Testing for Doneness: Hollow Sound and Temperature
To make sure your air fryer bread is done, try a couple of easy tests. First, tap the bottom of the loaf. It should sound hollow. This means the inside is fully baked.
Next, use an instant-read thermometer to check the internal temperature. The bread should be between 190-200°F at the center. If it’s still soft or the crust isn’t golden, cook it a bit longer.
Using a digital thermometer is key for accurate results. It helps you know your bread is perfectly cooked. By listening for the hollow sound and checking the temperature, you can be sure your bread is ready to eat.
| Baked Good | Desired Doneness Temperature |
|---|---|
| Dense Cakes | 210°F |
| Fluffy Cakes | 200°F |
| Quick Breads | 200°F |
| Yeasted Breads | 190°F |
| Custards | 170°F |
| Cheesecake | 150°F |
Remember, a 2-3 degree margin of error is okay. For the best results, use a top-notch meat thermometer, like the Thermapen, to check your baked goods.
Always check the temperature of your air fryer bread after the minimum bake time. If it’s not there yet, keep checking every 5 minutes until it is.
Using Different Flours for Air Fryer Bread
Exploring flour options for air fryer bread opens up new possibilities. The usual recipe uses all-purpose flour. But, you can try other flours for different tastes and textures.
Bread flour makes the bread chewier and more like artisan bread. It has more protein, which strengthens the gluten. This results in a bread that’s heartier and more satisfying.
Whole wheat flour gives the bread a nutty flavor and a denser texture. It makes the bread more substantial.
Changing flours can change how the bread rises and bakes. You might need to adjust the liquid in the recipe. Start with the basic amounts and tweak as needed to get the texture and taste you want.
| Flour Type | Effect on Air Fryer Bread | Recommended Adjustments |
|---|---|---|
| Bread Flour | Chewier, more artisanal texture | May need to increase liquid slightly |
| Whole Wheat Flour | Denser, nuttier flavor | May need to increase liquid and adjust baking time |
| All-Purpose Flour | Soft, versatile texture | Follow base recipe as is |
Trying different flours is part of the fun of making air fryer bread. It’s a chance to find your favorite recipe.
Adjusting Air Fryer Settings for Perfect Baking
Finding the right temperature and time for baking bread in your air fryer is crucial. Different air fryers have different sizes, wattages, and heating types. So, you might need to try a few settings to find what works best for you.
The recipe suggests starting at 400°F for 15 minutes, then lowering to 350°F for 25-30 minutes. But, your air fryer might need a bit more time or a different temperature. Watch the bread closely and adjust as needed to get that perfect golden crust and soft inside.
Temperature and Time Variations
Food Network advises to lower the temperature by about 25°F and cooking time by 20% when using the bake setting. This helps because air fryers heat differently than ovens.
- Start with 400°F, but lower it to 375°F if the crust browns too fast.
- Begin with 15 minutes, then adjust to 18-20 minutes if needed.
- For the second stage at 350°F, start with 22-25 minutes and add more time if needed.
It’s important to watch your air fryer bread closely and adjust settings until you find the perfect match for your model. Tapping the loaf and listening for a hollow sound can also help you know if it’s done.
“Air fryers operate at higher temperatures for the air fry setting, perfect for crispy foods like French fries, chicken wings, or breaded vegetables. The bake setting, on the other hand, uses lower temperatures and is better for recipes requiring a gentle, even heat.”
By trying different temperatures and times, you can get that amazing crust and soft inside every time you bake bread in your air fryer.
Shaping and Scoring Air Fryer Bread Dough
Before baking your air fryer bread, it’s key to shape and score the dough right. Start by stretching the dough into a rectangle. Then, fold the top and bottom towards the center, like folding a letter.
Roll the dough into a tight ball, pinching the seam to seal. Place it in your prepared baking pan or dish.
Just before baking, score the top of the loaf with a sharp knife or a lame. This step makes the bread look good and helps it bake evenly. Scoring controls how the bread expands, making it look beautiful.
Getting good at shaping and scoring is important for your air fryer bread’s texture and look. By following these steps, you’ll make a loaf that will wow your loved ones.


